Short hair on children is practical, vibrant, and undeniably adorable. However, many parents and caregivers feel limited when it comes to styling shorter tresses. The common misconception is that short hair lacks versatility, leaving kids with the exact same look day after day.
Whether your child has a textured pixie, a sleek bob, soft natural curls, or a classic tapered undercut, short hair offers an extraordinary canvas for creativity. From quick morning school runs to party looks, here are 20 realistic, stylish, and Pinterest-friendly hairstyles.


1. The Mini Dutch Braid Side Sweep
What This Idea Means
This look features a structured, three-dimensional Dutch braid crafted along one side of the hairline, sweeping the front layers away from the face while letting the rest of the short hair fall naturally. It brings an exquisite flair to pixie cuts and chin-length bobs.
How To Make It
- Start with damp or misted hair and detangle thoroughly using a soft brush.
- Create a deep side part above the outer arch of one eyebrow using a rat-tail comb.
- Section out a 1-inch piece of hair along the hairline at the part line and divide into three equal strands.
- Begin a Dutch braid by crossing the outer strands underneath the middle strand.
- With each stitch, pick up a small slice of hair from the hairline side and add it to the outer strand before crossing under.
- Continue braiding down past the temple until you reach behind the ear.
- Secure with a clear mini elastic, tucking the end under the loose hair behind the ear with a bobby pin.
Tips & Variations
- Pancake for Volume: Gently tug at the outer loops of the braid after securing to make it look fuller.
- Ribbon Accent: Weave a thin satin ribbon along with one of the strands for a pop of color.
- Dual Side Sweep: Repeat on the opposite side to create a halo effect at the front.
What You Need
- Fine-tooth rat-tail comb
- Spray bottle with water
- Clear mini elastic bands
- Matching bobby pins
- Light-hold hairspray
2. The Half-Up Micro Top-Knot
What This Idea Means
The micro top-knot takes the top crown section of short hair and gathers it into a small, playful bun, leaving the sides and back hanging freely. It adds height, keeps bangs out of the eyes, and delivers an effortlessly chic aesthetic.
How To Make It
- Gather the crown section of the hair starting from the temples up to the crown area in a U-shaped section.
- Smooth the section using a bristle brush to eliminate bumps.
- Secure the section into a high ponytail on top of the head using a small fabric hair tie.
- On the final wrap of the hair tie, pull the ponytail halfway through to create a mini loop.
- Wrap the remaining tail around the base of the loop to hide the elastic and secure with a small bobby pin.
- Lightly ruffle the lower loose hair or apply a touch of curl cream for texture.
Tips & Variations
- Scrunchie Pop: Finish the base of the top-knot with a mini velvet or satin scrunchie.
- Textured Messy Knot: Tease the ponytail slightly before wrapping to give the knot a whimsical volume.
- Double Micro Knots: Split the crown into two mini top knots for a space-bun variation.
What You Need
- Soft bristle brush
- Mini fabric elastics
- Small bobby pins
- Mini scrunchies (optional)
- Light styling paste
3. Twisted Front Accent Rows
What This Idea Means
Perfect for very short haircuts, bob lengths, or pixie cuts, this technique involves creating multiple parallel flat twists along the top section of the head. It yields a neat, secure style that stays intact all day during energetic activities.
How To Make It
- Comb hair back or decide on a center part. Divide the front hairline into three to four small vertical sections (about 1 inch wide each).
- Take the first section, split it into two strands, and cross the front strand over the back strand to create a twist.
- Add a small piece of hair to the bottom strand as you move along the scalp, continuing the two-strand flat twist toward the crown.
- Once you reach the crown, secure the end with a colorful mini rubber band.
- Repeat across all sections, creating uniform parallel twisted rows.
- Leave the back section smooth or fluffed depending on hair texture.
Tips & Variations
- Rainbow Bands: Use multi-colored elastic bands to make the hairstyle vibrant for summer.
- Criss-Cross Pattern: Cross adjacent twists over each other before securing to form a diamond lattice.
- Textured Hair Care: Works exceptionally well on coily and curly hair using a dab of edge control for sleek lines.
What You Need
- Sectioning rat-tail comb
- Edge control gel or moisturizing cream
- Mini colorful elastics
4. Sleek Side-Parted Pixie with Snap Clips
What This Idea Means
A timeless classic for kids with short pixie cuts. This style emphasizes a sharp, clean side part combined with smooth layers pinned down with decorative, stylish snap clips or barrettes.
How To Make It
- Apply a small drop of lightweight smoothing serum or leave-in conditioner to damp hair.
- Use a fine comb to trace a crisp, deep side part from the front hairline back to the crown.
- Comb hair on both sides smooth and flat against the scalp following the direction of natural growth.
- Position two or three decorative snap clips parallel to each other along the heavier side of the part.
- Tuck the opposite side neatly behind the ear, setting it with a touch of styling wax.
Tips & Variations
- Pattern Stacking: Stack pastel matte or pearl-embellished snap clips in a row for a runway-inspired look.
- Soft Finger Waves: Use comb teeth to push subtle S-shaped waves into the front fringe before setting clips.
What You Need
- Fine-tooth comb
- Lightweight smoothing cream/serum
- Decorative snap clips or acrylic barrettes
5. Bubble Pigtail Accent Framing
What This Idea Means
Bubble braids work amazingly well on short hair when styled as accent framing pieces. By adding small elastics along two thin front sections, you create cute, buoyant “bubbles” that frame the face while keeping short strands neat.
How To Make It
- Part hair down the center or slightly off-center.
- Gather a small 1-inch section from the front hairline on one side and secure with a mini elastic at the root.
- Move down 1.5 inches, place a second elastic, then gently tug outward on the hair between the two elastics to expand it into a rounded bubble shape.
- Repeat down the length of the section (usually 2-3 bubbles for short hair).
- Duplicate the exact procedure on the opposite side.
Tips & Variations
- Color Matching: Match elastic colors with clothing or opt for clear bands for a minimalist look.
- Glitter Finish: Sprinkle hair-safe glitter gel over the bubbles for special occasions.
What You Need
- Mini clear or pastel elastic bands
- Parting comb
- Hair-safe glitter gel (optional)


6. The Textured Faux-Hawk
What This Idea Means
For adventurous kids with short pixie cuts or tapered cuts, the textured faux-hawk offers an edgy, spirited look. It channels volume and texture straight up into the center line without needing shaved sides.
How To Make It
- Start with clean, towel-dried hair.
- Dampen hair slightly with texturizing sea-salt spray or lightweight styling mousse.
- Using a blow dryer or your fingers, lift the center section of hair straight upwards from forehead to nape.
- Work a small dime-sized amount of kid-friendly matte styling wax between your palms.
- Pinch the hair along the middle strip upward and inward toward the center to form a defined ridge.
- Smooth the side sections downward flat against the head for contrast.
Tips & Variations
- Spiky Top: Create individual soft spikes along the ridge instead of a continuous crest for shorter hair.
- Color Hair Chalk: Add temporary child-safe hair chalk to the tips of the faux-hawk for highlights.
What You Need
- Blow dryer
- Matte finish kid-safe styling wax
- Texturizing spray
- Temporary hair chalk (optional)
7. The Retro Inverted Bob Flip
What This Idea Means
A vintage-inspired, elegant style designed for chin-length or jaw-length short bobs. By flipping the ends outward, this hairstyle creates a playful look that brings movement and personality to simple short hair.
How To Make It
- Apply heat protectant spray evenly across clean, damp hair.
- Using a round brush and blow dryer, dry hair straight down to the ends.
- When reaching the bottom inch of hair, roll the brush upward and outward, directing heat toward the curve to flip the ends out.
- Allow each section to cool for a few seconds before releasing to set the flip shape.
- Part hair cleanly down the middle or deep to the side.
- Finish with a light-hold spray to keep the flipped ends bouncy throughout the day.
Tips & Variations
- Headband Pairing: Add a wide fabric headband or velvet bow headband right behind the bangs for a retro vibe.
- Inward vs Outward: Flip front sections inward and side sections outward for modern contrast.
What You Need
- Round brush
- Blow dryer
- Heat protectant
- Flexible hairspray
- Fabric headband (optional)
8. The Crown Rope-Twist Halo
What This Idea Means
The rope-twist halo creates an angelic frame around the head. Using two-strand rope twists wrapped along the crown, this style secures short front strands effortlessly while producing an intricate appearance.
How To Make It
- Part hair down the center. Take a section from the left front hairline and divide into two equal strands.
- Twist both individual strands clockwise separately. Then, cross them over each other counter-clockwise to form a rope twist.
- As you move along the side of the head, feed small pieces of hair from the top into the strands, keeping the rope tight along the scalp.
- Stop behind the left ear and pin firmly with crossed bobby pins.
- Repeat the identical process on the right side.
- Join the ends of both twists at the back of the head with a clear band or hide under loose back hair.
Tips & Variations
- Flower Pins: Tuck tiny flower clips into the twists for spring events or photoshoots.
- Soft Tendrils: Pull out two wispy strands near the ears to soften the face frame.
What You Need
- Fine comb
- Mini elastics
- Bobby pins
- Decorative flower hair pins
9. The Messy Curly Pineapple Updo
What This Idea Means
Designed specifically for kids with natural curls, coils, or wave patterns on short hair. The pineapple gathers all curls up to the top front of the head, protecting curl structure while showcasing volume and bounce.
How To Make It
- Dampen curls with a mixture of water and leave-in conditioner to reactivate curl definition.
- Apply a dollop of curl cream or gel, smoothing it gently upward along the sides and nape of the neck.
- Gather all hair loosely towards the top front of the crown, right near the forehead.
- Fasten with a soft satin or silk scrunchie, wrapping it only once or twice so it doesn’t crush curls.
- Allow curls to cascade forward over the forehead like a crown.
Tips & Variations
- Bandana Wrap: Tie a colorful folded bandana or silk scarf around the sides and back to hold shorter stray hairs up.
- Edge Styling: Lay down baby hairs at the hairline using a soft brush and edge gel for a crisp finish.
What You Need
- Water spray bottle
- Leave-in curl cream
- Wide-tooth comb
- Soft satin scrunchie
- Silk scarf/bandana
10. Triple Row Dutch Pigtail Braids
What This Idea Means
A sporty, active style that divides short hair into three parallel Dutch braids running straight back from hairline to nape. It keeps even the shortest layers tightly secured during sports or gymnastics.
How To Make It
- Divide hair into three clean, equal vertical sections using a parting comb (left, middle, right).
- Clip away two sections while working on the first.
- Starting at the front hairline, begin a small, tight Dutch braid (crossing strands under), incorporating small sections as you travel straight back.
- Braid all the way down to the nape of the neck and secure with a sturdy mini elastic.
- Unclip the second section and repeat, followed by the third section.
- Lightly mist with hairspray to prevent flyaways.
Tips & Variations
- Glitter Roots: Apply hair gel mixed with fine craft glitter along the parting lines for festival flair.
- Braid into Micro Pigtails: Let the tiny braid ends stick out as playful mini pigtails at the nape.
What You Need
- Sectioning clips
- Rat-tail parting comb
- Strong mini elastics
- Light hairspray


11. The Asymmetrical Undercut Swoop
What This Idea Means
A bold modern haircut style where one side is shaved short while the top and opposite side retain longer textured length swept dramatically across the forehead.
How To Make It
- Wash and blow-dry hair using a vent brush, pushing all length from the crown over toward the longer side.
- Warm a pea-sized amount of styling pomade between fingers.
- Rake fingers through the top section, sweeping volume diagonally across the forehead to emphasize asymmetry.
- Neaten the short shaved side by brushing it clean along its natural direction.
- Set with a light touch of hairspray for flexible movement.
Tips & Variations
- Etched Hair Art: Ask the barber to shave a subtle line or star design into the short undercut side.
- Slick Back Switch: Gel the longer section straight back for formal events.
What You Need
- Vent brush
- Blow dryer
- Matte pomade or texturizing paste
12. Soft Shag Bob with Textured Curtain Bangs
What This Idea Means
A low-maintenance look characterized by piecey layers, feathered ends, and gentle curtain bangs framing the eyes. It brings soft movement and a modern vintage vibe to short hair.
How To Make It
- Mist towel-dried hair with a lightweight texturizing spray or sea salt mist.
- Blow dry hair using fingers, tossing hair in different directions to build natural disheveled texture.
- Dry curtain bangs forward, then roll them back away from the face using a medium round brush.
- Part curtain bangs down the center, letting them curve gently out toward the cheekbones.
- Pinch ends of layers with a touch of texturizing cream to emphasize feathered edges.
Tips & Variations
- Air Dry Magic: Scrunch with mousse and let air dry for natural wave and zero heat exposure.
- Mini Side Clip: Pin one side back with a vintage tortoiseshell clip to create an asymmetrical variation.
What You Need
- Texturizing sea salt spray
- Blow dryer
- Round brush
- Styling cream
13. Criss-Cross Elastic Grid Ponytail
What This Idea Means
An ingenious geometric hairstyle designed for active kids with hair that is too short to gather into a single ponytail. By creating a grid of connected mini square ponytails across the crown, hair stays perfectly secured.
How To Make It
- Part hair horizontally from ear to ear across the top crown area. Divide this front strip into 4 small equal square sections.
- Secure each of the 4 sections into a small mini ponytail using elastics.
- Split section 2 and section 3 in half. Cross strands diagonally to form an “X” pattern connecting to new ponytail bases behind them.
- Secure the criss-crossed tails into 2 or 3 larger gathering ponytails at the crown.
- Comb remaining loose short hair at the back smooth.
Tips & Variations
- Ombre Elastic Bands: Arrange elastic band colors in gradient tones for a rainbow effect.
- Durable for Sports: Perfect choice for dance classes or sports games as no stray hairs can escape.
What You Need
- Rat-tail comb for clean parts
- Smoothing gel
- Multi-colored mini elastics
14. The French Roll Side Tuck
What This Idea Means
An sophisticated updo style adapted for short hair lengths. It gathers hair from one side and rolls it tightly along the nape into an exquisite side tuck, perfect for formal parties.
How To Make It
- Gently tease crown hair using a fine comb to create subtle structural height.
- Sweep all hair over to the lower right side of the nape.
- Hold fingers vertically against hair and roll the hair edge inward toward the scalp, forming a smooth vertical roll.
- Pin roll securely along its seam using bobby pins inserted vertically.
- Smooth down top flyaways with a light coat of hairspray or pomade.
- Decorate seam line with pearl decorative pins.
Tips & Variations
- Pearl Accents: Slide pearl-topped pins along the roll line for fairy-tale elegance.
- Messy Chic: Leave short fringe layers out around temples and curl them slightly.
What You Need
- Teasing comb
- Heavy-duty bobby pins
- Pearl decorative hair pins
- Strong-hold hairspray
15. The Double Mini Space Buns
What This Idea Means
Space buns are cheerful and fun. On short hair, mini space buns sit high on the crown, utilizing top layers while letting short back strands rest or be pinned neatly up.
How To Make It
- Part hair cleanly down the middle from forehead to crown.
- Gather upper half section of left side into a high pigtail and tie with an elastic.
- Gather upper half section of right side to match identically.
- Twist each pigtail tail tightly around its base to form a small bun circle, securing with a second elastic and bobby pins.
- If back hair falls short, use decorative snap clips to pin short nape hair flat upward.
Tips & Variations
- Glitter Center Part: Paint a line of hair glitter along the center part between space buns.
- Ribbon Wraps: Wrap small satin bows around the base of each mini bun.
What You Need
- Center parting comb
- Mini elastic bands
- Bobby pins
- Satin bow accessories (optional)


16. The Tapered Pompadour Push-Back
What This Idea Means
A classic stylish look for kids with tapered short haircuts or crew cuts. The pompadour pushes volume up and back off the forehead, creating a refined aesthetic.
How To Make It
- Apply a coin-sized amount of styling gel or strong hold pomade to damp hair.
- Blow-dry hair using a small round brush, pulling top front hair upwards and backward away from forehead.
- Once dry, use a fine comb to slick sides back neatly toward ears.
- Comb top hair smoothly up and back, shaping a rounded volume curve above the forehead.
- Allow gel to set for a crisp, long-lasting structure.
Tips & Variations
- Matte Finish: Substitute high-shine gel with matte clay for a modern casual look.
- Side Part Pompadour: Combine with a crisp razor part on one side for sharp contrast.
What You Need
- Strong-hold pomade/gel
- Blow dryer
- Fine-tooth comb
- Small round brush
17. Scarf-Intertwined Crown Headband
What This Idea Means
A creative accessory-driven hairstyle where a vibrant silk or cotton scarf is integrated directly into front twist or braid sections, turning short hair into a fashion statement.
How To Make It
- Fold a narrow silky hair scarf into a thin 1-inch strip.
- Place center of scarf at nape of neck and bring both ends up toward top hairline like a headband.
- Tie a small knot at top hairline.
- Take front short hair strands and wrap them tightly around scarf ends, tucking them back toward ears.
- Tie scarf ends into a cute bow at top or side of head.
Tips & Variations
- Seasonal Prints: Use floral scarves in spring, bright tropical prints in summer, and plaid prints in autumn.
- Secure with Pins: Secure scarf base at nape with bobby pins to keep it from slipping off smooth child hair.
What You Need
- Lightweight patterned hair scarf
- Bobby pins
- Light styling paste
18. The Messy Textured Bowl Cut Twist
What This Idea Means
A fresh modern reinvention of the traditional bowl cut. By adding choppy internal layers and piecey texture, this haircut turns a retro shape into a cool, edgy street-style look.
How To Make It
- Wash hair and towel dry gently to retain moisture.
- Apply a small amount of sea salt foam or light texturizing cream throughout.
- Use a blow dryer with a diffuser attachment, scrunching hair upward with fingers to break up uniform straight lines.
- Pinch individual pieces along fringe and crown with styling wax to give a piecey finish.
- Shake hair lightly with hands for natural movement.
Tips & Variations
- Side Swept Bangs: Sweep bowl fringe slightly to one side rather than straight across for a softer face frame.
- Colored Hair Spray: Add temporary wash-out pastel spray to fringe edges for weekend fun.
What You Need
- Sea salt texturizing foam
- Blow dryer with diffuser
- Flexible styling wax paste
19. Waterfall Twist Side Fringe
What This Idea Means
The waterfall twist creates a cascading effect where strands fall gracefully through a two-strand horizontal twist. It allows short hair to look intricately styled while letting length flow naturally.
How To Make It
- Part hair on the side. Take two small sections near front part line.
- Cross front strand over back strand.
- Pick up a new small strand from top crown of hair and lay it between the two strands (letting it drop through like a waterfall).
- Twist original two strands together again, locking dropped strand in place.
- Repeat pattern 4 to 5 times moving toward back of ear.
- Secure end behind ear with a discreet bobby pin under top layers.
Tips & Variations
- Double Waterfall: Create a second parallel waterfall twist 1 inch below the first one for double cascading detail.
- Soft Wand Curls: Wand-curl dropped waterfall strands for extra dimension and elegance.
What You Need
- Tail comb
- Bobby pins
- Mini curling wand (optional)
- Light hairspray
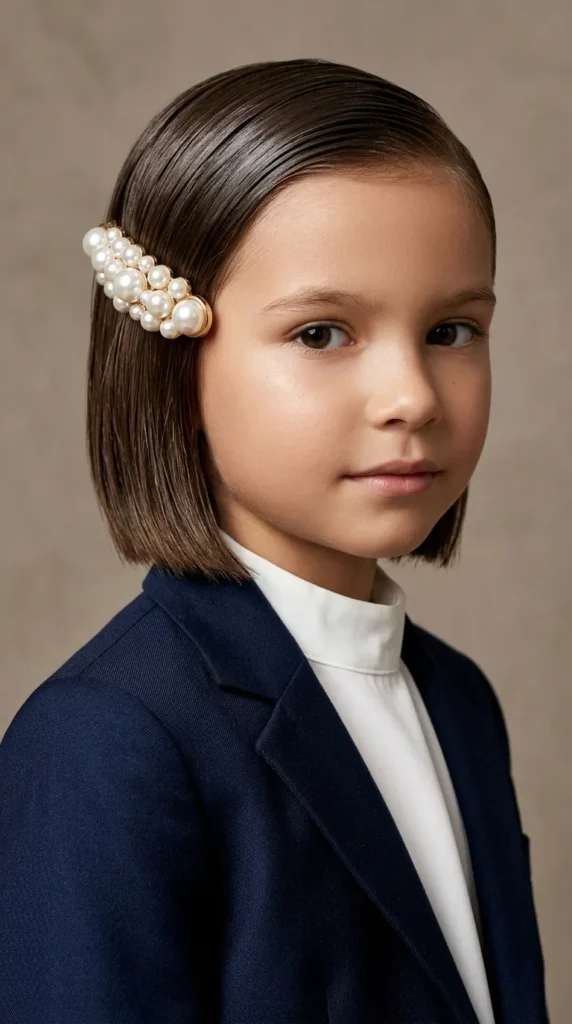
20. Slicked-Back Wet Look with Pearl Barrette
What This Idea Means
An editorial-inspired look that works brilliantly on short bobs and pixie cuts. Hair is combed smoothly straight back off the face with a high-shine finish, anchored by a statement pearl barrette.
How To Make It
- Start with clean, damp hair.
- Apply a generous mix of high-shine hair gel and leave-in conditioner evenly from roots to tips.
- Use a wide-tooth comb to slick all hair straight back from forehead over crown and behind ears.
- Place a large statement pearl barrette horizontally on one side above ear to pin back side flyaways and add a luxury accent.
- Allow to air dry or set gently with a blow dryer diffuser on low air setting.
Tips & Variations
- Deep Side Slick: Instead of straight back, slick hair diagonally across for an ultra-sleek Hollywood look.
- Glitter Gel Shine: Mix micro-fine iridescent shimmer into gel for shimmering evening events.
What You Need
- Wide-tooth comb
- High-shine styling gel
- Leave-in conditioner
- Oversized statement pearl barrette


