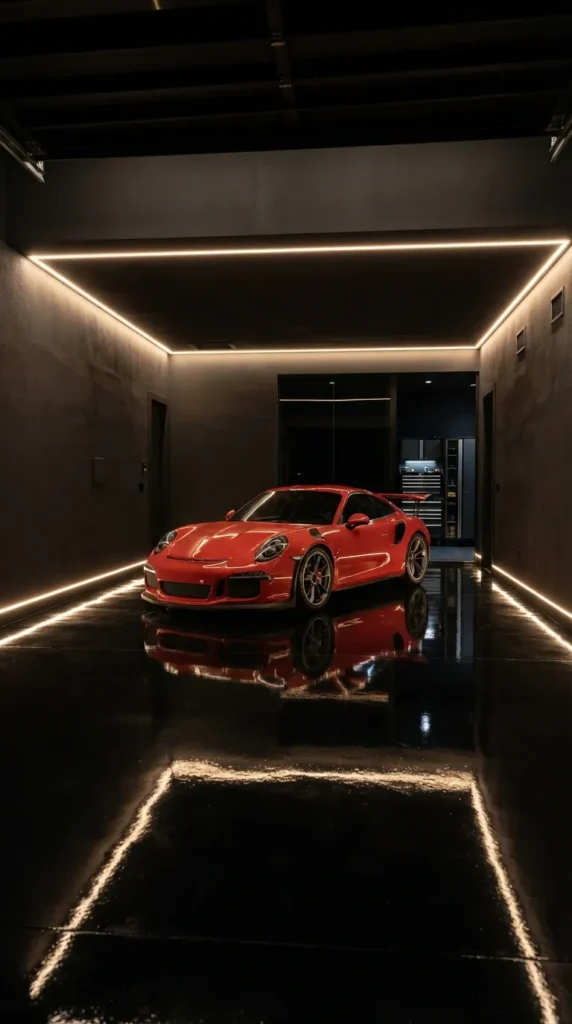
The modern garage has evolved far beyond a dusty shelter for vehicles and abandoned boxes. Today, it stands as an extension of the home—a multi-functional sanctuary where high-end aesthetics meet utility. Transforming a traditional garage into a modern interior masterpiece requires thoughtful planning, smart layout strategies, and high-performance materials. Below are 20 contemporary design ideas to elevate your garage into a sleek, functional, and stylish space.

1. Sleek Epoxy Grid Flooring

What This Idea Means

Epoxy grid flooring involves applying a multi-layer resin coating over concrete, finished with geometric tile lines or custom grid designs. It yields a seamless, high-gloss floor that reflects light, resists chemical spills, and provides an instant luxury showroom appearance.

How to Make It

  1. Clean and diamond-grind the concrete base to ensure strong adhesion.
  2. Repair any cracks or surface imperfections using an epoxy filler.
  3. Apply a primer layer, followed by a pigmented base epoxy coat.
  4. Paint or lay precision grid lines using contrasting epoxy tones.
  5. Apply a high-grade polyurethane or polyaspartic clear topcoat for extra protection and gloss.

Tips & Variations

  • Metallic Epoxy: Mix metallic pigments into the resin for a sleek, flowing fluid design.
  • Non-Slip Texture: Add quartz or aluminum oxide grit into the final coat for wet traction.
  • Maintenance: Sweep regularly with a soft microfiber dust mop and clean with pH-neutral solutions.

2. Integrated Slatted Wood Accent Walls

What This Idea Means

Slatted wood accent walls feature vertical timber slats mounted over black or dark acoustical felt. This design introduces natural warmth, texture, and acoustic dampening to a hard-surfaced garage setting.

How to Make It

  1. Paint the target wall in a matte dark charcoal or black hue.
  2. Install black acoustic felt panels to absorb sound vibrations.
  3. Mount pre-treated oak, cedar, or walnut wood slats vertically using finish nails and construction adhesive.
  4. Maintain uniform 0.5-inch spacing using wood block spacers during installation.

Tips & Variations

  • Integrated Hooks: Hide slim black metal pegs between slats to hang bikes or tools seamlessly.
  • LED Backlighting: Recess thin LED strip lighting behind the edges to highlight the wood texture.
  • Composite Slatting: Use moisture-resistant composite slats for high-humidity environments.

3. Floor-to-Ceiling Matte Black Cabinets

What This Idea Means

A full-wall installation of handleless, floor-to-ceiling cabinetry in a deep matte black finish. This creates a minimalist wall-to-wall aesthetic while hiding tools, equipment, and storage clutter out of sight.

How to Make It

  1. Measure wall dimensions and map out utility outlets and breaker access points.
  2. Secure heavy-duty steel mounting tracks directly into the wall studs.
  3. Install modular, powder-coated steel or exterior-grade MDF cabinet units.
  4. Add push-to-open latch mechanisms to avoid bulky external hardware.

Tips & Variations

  • Anti-Fingerprint Coating: Use matte laminate with anti-fingerprint technology to keep surfaces spotless.
  • Warm Wood Trim: Frame the cabinetry perimeter with natural oak trim for subtle contrast.
  • Internal Organization: Add custom foam inserts and adjustable shelving inside every unit.

4. Overhead Hexagon LED Light Grid

What This Idea Means

An architectural lighting setup featuring interlocking honeycomb-style LED tube lights installed across the ceiling. It provides high-intensity, shadow-free illumination perfect for detailing cars or showcasing space.

How to Make It

  1. Design the grid layout on paper to determine the number of modular connector pieces needed.
  2. Anchor support frame grids directly into the ceiling studs or hang them via thin aircraft wire.
  3. Snap the modular light tubes into three-way and two-way connectors according to the pattern.
  4. Wire the main power harness to a dedicated wall switch or smart dimmer module.

Tips & Variations

  • Smart Dimming: Integrate a smart Wi-Fi switch to control color temperature and intensity.
  • Zoned Lighting: Wire perimeter lighting and central lighting on separate switches.
  • Color Temperature: Choose 5000K to 6000K daylight white tubes for accurate color rendition.

5. Recessed Treadmill and Gym Nook

What This Idea Means

A dedicated, streamlined fitness zone within the garage featuring impact-absorbing flooring, mirrored walls, and flush-mounted storage to keep workout gear organized and out of the vehicle area.

How to Make It

  1. Section off a corner away from vehicle swing zones.
  2. Lay down high-density vulcanized rubber interlock tiles over the concrete.
  3. Install floor-to-ceiling acrylic mirrors along the main wall.
  4. Frame recessed wall niches or float black metal shelves to store kettlebells, bands, and towels.

Tips & Variations

  • Climate Control: Install a mini-split heat pump unit directly above the workout area.
  • Acoustic Panels: Place decorative acoustic wall art around the gym area to muffle impact noise.
  • Folding Racks: Use wall-mounted folding squat racks to reclaim floor space when needed.

6. Frameless Glass Overhead Garage Doors

What This Idea Means

Replacing traditional panel doors with full-view, anodized aluminum frames fitted with tinted or frosted tempered glass panels. This allows controlled natural light to flood into the interior while maintaining privacy and a modern architectural edge.

How to Make It

  1. Consult a professional garage door technician to measure rough openings and structural headers.
  2. Choose commercial-grade, thermal-break aluminum frames finished in black or dark bronze.
  3. Opt for dual-pane insulated tempered glass with custom tinting or satin privacy etching.
  4. Install quiet belt-drive or side-mount jackshaft garage door openers.

Tips & Variations

  • Smart Glass: Use switchable electrochromic glass that turns opaque at the press of a button.
  • Integrated Screen: Add a roll-down motorized mesh screen to keep bugs out when the door is open.
  • Low-E Coating: Apply low-emissivity coatings to keep heat out during summer months.

7. Floating Powder-Coated Metal Workbenches

What This Idea Means

A wall-anchored, legless workbench with a heavy-duty steel or butcher block surface. Removing floor supports creates an open, weightless appearance while making floor cleaning quick and easy.

How to Make It

  1. Locate studs and anchor heavy-gauge steel gusset brackets using lag bolts.
  2. Mount a heavy powder-coated steel box frame onto the wall brackets.
  3. Top the frame with a sealed hardwood butcher block or stainless steel slab.
  4. Install undershelf magnetic strips and flush power outlets along the backsplash.

Tips & Variations

  • Under-Cabinet Strip Lights: Mount continuous LED bar lights below the workbench to eliminate shadows.
  • Stainless Steel Top: Swap wood for brush-finished stainless steel for superior chemical resistance.
  • Fold-Down Design: Use heavy-duty locking drop-leaf brackets so the workbench can fold flat.

8. Polished Industrial Concrete Flooring

What This Idea Means

Transforming standard raw concrete into a mirror-like finish through mechanical grinding, densifying, and polishing steps. It creates a durable, high-end industrial finish without synthetic surface coatings.

How to Make It

  1. Grind the raw concrete floor using coarse diamond-grit abrasive pads to strip existing stains.
  2. Apply a liquid chemical densifier to harden the concrete matrix.
  3. Continuously grind with progressively finer diamond pads (up to 3000 grit) to achieve a high sheen.
  4. Apply a penetrating sealer and burnish the surface with a high-speed buffer.

Tips & Variations

  • Stained Accent: Add a dark charcoal or amber acid stain before final polishing for subtle color depth.
  • Exposed Aggregate: Grind deeper into the slab to expose inner aggregate stones for a terrazzo look.
  • Easy Upkeep: Clean using microfiber pads with neutral-pH cleaner—no waxing or stripping required.

9. Modular Metal Pegboard Systems

What This Idea Means

Replacing old fiberboard pegboards with sleek, powder-coated aluminum or galvanized steel panels featuring clean geometric slots and matching metal accessories.

How to Make It

  1. Install furring strips or mount metal pegboard panels directly to wall studs using built-in flanges.
  2. Align panels side-by-side to form a continuous grid wall.
  3. Insert specialized locking hooks, brackets, bins, and tool holders onto the panel matrix.

Tips & Variations

  • Color Blocking: Use matte black panels paired with brightly colored anodized metal tool hooks.
  • Integrated Power: Add modular power strip attachments designed specifically for metal slot systems.
  • Framed Boundaries: Enclose the pegboard system with thin aluminum angle trim for a framed finish.

10. Climate-Controlled Lounge and Entertainment Corner

What This Idea Means

A dedicated nook featuring comfortable leather seating, a wall-mounted display, a mini-fridge, and independent temperature control. It turns a portion of the garage into a refined retreat.

How to Make It

  1. Frame out an interior corner and install insulation batts (or spray foam) along exterior walls.
  2. Drywall, tape, sand, and paint the area with a smooth finish.
  3. Install a ductless mini-split system for climate control.
  4. Wire wall brackets for a screen, soundbar, and compact beverage cooler.

Tips & Variations

  • Acoustic Treatments: Hang fabric-wrapped wall panels to cut echo and refine audio quality.
  • Custom Cabinetry: Built-in cabinetry keeps barware and electronics concealed.
  • Rug Accents: Add a low-pile area rug to define the lounge space away from the vehicle zone.

11. Dual Vehicle Hydraulic Stacker Lifts

What This Idea Means

A space-saving mechanical lift system that stores two vehicles vertically in a single bay, optimizing vertical ceiling clearance while creating an elevated automotive display look.

How to Make It

  1. Verify ceiling height clearance (typically 11–12 feet minimum) and check slab thickness and PSI strength.
  2. Position double-post hydraulic steel lift posts according to manufacturer specifications.
  3. Drill deep concrete anchor holes and secure post bases with heavy-duty wedge anchors.
  4. Wire the hydraulic power unit to a dedicated 220V electrical circuit.

Tips & Variations

  • Under-Car LED Lighting: Mount thin LED bar lights under the lift tracks to illuminate the car below.
  • Drip Trays: Install lightweight polycarbonate drip trays between tracks to catch potential fluid leaks.
  • Matching Powder Coat: Custom paint the lift posts to match your interior wall or cabinet color scheme.

12. Floor-to-Ceiling Vertical Bike Storage Wall

What This Idea Means

A vertical wall rack configuration designed to hold multiple bicycles cleanly off the floor, transforming them into a functional wall installation.

How to Make It

  1. Secure a horizontal aluminum mounting rail along wall studs at high elevation.
  2. Attach adjustable vertical drop tracks or rubber-coated wheel hooks along the rail.
  3. Install subtle rubber wall guards where tires contact the paint to eliminate scuffs.

Tips & Variations

  • Motorized Hoists: Use electric ceiling-mounted hoists for heavy mountain bikes or e-bikes.
  • Sliding Tracks: Use a sliding horizontal track system so bikes slide together to save space.
  • Integrated Gear Shelf: Mount a matching top shelf over the bikes for helmets, shoes, and pumps.

13. Minimalist Ceiling-Mounted Storage Frames

What This Idea Means

Heavy-duty steel wire overhead racks suspended directly from ceiling joists. This system reclaims overhead space for long-term storage totes without visually cluttering the main walls.

How to Make It

  1. Locate ceiling joists using a stud finder and mark attachment points with a chalk line.
  2. Secure heavy-duty steel ceiling brackets into joist centers using lag bolts.
  3. Lower vertical down-drop bars to desired heights and connect steel wire rack platforms.
  4. Fill with uniform, labeled storage totes for an organized appearance.

Tips & Variations

  • Integrated Safety Nets: Add perimeter lip guards or cargo nets to secure totes from accidental shifts.
  • Pulley Lowering Racks: Install crank-operated or motorized drop racks for effortless loading at ground level.
  • Color Matching: Choose ceiling racks painted in the same tone as your ceiling paint to make them blend in.

14. Integrated Detailer’s Wash Station with Hose Reels

What This Idea Means

A sleek wall station equipped with a high-pressure washer, auto-retractable hose reels, water filtration equipment, and detailing supply racks for car care enthusiasts.

How to Make It

  1. Mount a compact wall-hung electric pressure washer directly into studs near water supply lines.
  2. Connect double deionized water filtration tanks to prevent water spots.
  3. Install spring-loaded retractable reels for pressure hoses and air lines flush against the wall.
  4. Mount stainless steel shelves above the station for chemicals, microfiber towels, and foam cannons.

Tips & Variations

  • Stainless Steel Backsplash: Install a stainless steel wall panel behind the washing area to handle water splashes.
  • Blow-Dryer Reels: Mount a dedicated heated car dryer with an overhead boom arm.
  • Drainage Channels: Install an integrated floor trench drain near the station to capture run-off water easily.

15. Hidden Flush-Mount Wall Storage Panels

What This Idea Means

Wall paneling systems where cabinets, drawers, and access doors install flush with the drywall, creating a seamless, handle-free perimeter.

How to Make It

  1. Build out stud framing with recessed wall pockets to house storage modules.
  2. Install handleless cabinet boxes fitted with push-to-open touch latches.
  3. Apply matching wall finish materials—such as smooth drywall or composite panels—directly onto door faces.
  4. Keep trim gaps around doors precise (1/8 inch) for a hidden look.

Tips & Variations

  • Secret Access Doors: Conceal mechanical equipment, water heaters, or electrical panels behind matching flush doors.
  • Integrated Vertical Lighting: Frame hidden doors with thin vertical aluminum LED channels.
  • Textured Panels: Cover the entire wall and hidden doors in dark textured laminate for added visual interest.

16. Custom Acoustic Slat Ceiling Panels

What This Idea Means

Installing suspended acoustic ceiling panels or wooden slat grids on the garage ceiling to absorb sound echo while introducing warmth and texture overhead.

How to Make It

  1. Seal and paint the ceiling substrate black.
  2. Install sound-absorbing felt backing boards using drywall screws and adhesive.
  3. Attach pre-fabricated linear wood slat modules overhead, securing them directly into joists.
  4. Cut out openings for light fixtures and garage door hardware tracks cleanly.

Tips & Variations

  • Recessed Strip Lights: Embed linear LED profile tracks flush between wood slats for seamless illumination.
  • Dark Stain Finish: Use dark walnut or black-stained ash slats for a sophisticated, cozy look.
  • Floating Ceiling Islands: Create a drop-down floating panel island over specific work zones rather than covering the whole ceiling.

17. High-End Custom Golf Simulator Bay

What This Idea Means

An integrated corner or dedicated bay equipped with a high-impact enclosure screen, turf floor matting, overhead launch monitor, and short-throw projection system.

How to Make It

  1. Reserve a bay area with at least 9 to 10 feet of clear vertical ceiling height and 12 feet of width.
  2. Install heavy impact-absorbing padded wall panels and suspended ceiling curtains.
  3. Lay high-density artificial turf over a rubber underlayment pad.
  4. Mount an impact screen and connect an overhead tracking camera and projector system.

Tips & Variations

  • Retractable Curtains: Use side protection curtains on ceiling tracks so they can roll back when storing a car.
  • Multi-Sport Setup: Use software packages that support sports like multisport target shooting, soccer, or home theater use.
  • Flush Turf Integration: Sink the hitting mat flush into surrounding garage flooring for a level transition.

18. Modern Stainless Steel Garden & Mudroom Hub

What This Idea Means

A sleek transitional zone positioned near the entry door leading into the home, featuring stainless steel wash sinks, boot benches, coat hooks, and durable storage.

How to Make It

  1. Extend water supply and drainage pipes near the interior access door.
  2. Install a wall-mounted commercial-grade stainless steel utility sink with a high-arch pull-down faucet.
  3. Build a matching bench with lower shoe cubbies using powder-coated steel or sealed hardwood.
  4. Mount heavy-duty coat hooks and open shelving overhead for quick grab-and-go access.

Tips & Variations

  • Boot Dryer Port: Incorporate hidden low-voltage boot dryer tubes inside lower shoe cabinets.
  • Tile Backsplash: Add a subway tile backsplash behind the sink to protect drywall from splashes.
  • Drip Tray Floor Mat: Inset a stainless steel floor tray under the bench to catch mud and water off wet boots.

19. Architectural Smart Glass Partition Walls

What This Idea Means

Using interior glass divider panels to separate clean zones (like a home office or gym) from vehicle bays while maintaining an open, sunlit environment.

How to Make It

  1. Mount black powder-coated aluminum framing tracks along the floor, walls, and ceiling joists.
  2. Install double-pane toughened glass panels securely into tracks using rubber gaskets.
  3. Add a sliding or swing glass door equipped with minimalist architectural pull handles.

Tips & Variations

  • Switchable Privacy Glass: Use smart electrochromic glass panels that instantly switch between clear and opaque modes.
  • Crittall-Style Framing: Apply black grid mullions over glass panes for an industrial loft aesthetic.
  • Climate Partitioning: Ensure rubber sweep seals are installed on doors to keep vehicle smells out of the clean room side.

20. Luxury Showroom Perimeter Cove Lighting

What This Idea Means

Diffused perimeter lighting installed around upper wall edges and baseboard channels. It casts a soft, continuous glow across walls and floors for a luxury automotive display atmosphere.

How to Make It

  1. Install crown moldings or continuous aluminum LED channel extrusions around top perimeter walls.
  2. Lay high-density, COB (Chip-on-Board) LED strip lighting inside channels to avoid hot-spot reflections.
  3. Wire strips to low-voltage power drivers concealed within utility cabinets.
  4. Install frosted diffuser covers over all channels for a soft, uniform light output.

Tips & Variations

  • Baseboard Cove Effects: Recess aluminum channels along lower baseboards to make floors appear to float.
  • RGBW Dynamic Colors: Choose smart RGBW LED strips to change lighting colors via smartphone apps.
  • Automated Motion Sensing: Wire cove lights to smart occupancy sensors so the room glows upon entry.

By Roger